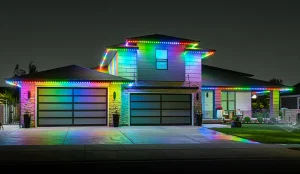
Planning to install permanent outdoor lighting for your home in Austin? We know the kids and other family members in your home must be feeling excited. After all, who wants the hassle of climbing ladders and untangling wires every Christmas season?
But there might be one question sitting right behind this excitement.
“How long does LED light installation take?”
And that’s quite fair. Nobody wants a full crew of installers to take over the house for days or block the driveway.
However, here’s the good news.
Permanent LED light installation by Capital Trimlight Austin is much quicker and more straightforward than most homeowners expect.
Once the crew arrives, they follow a clear sequence of events, which might include survey, preparation, installation, connections, testing, and app setup. Still, many homeowners wonder: what does the day actually look like? How much time does it take? And what’s the overall process?
Let us walk you through every step of installation and the exact timeframe so you are mentally prepared before calling the installers.
Trimlight Installation Time Austin – How Long Does It Take?
If you are looking for a short answer, then here it is.
Trimlight installation time actually depends on the size and layout of your home.
This is a straightforward installation that can be completed in a single day or take just 4-8 hours. However, if the property is larger and has complicated architectural features like multiple rooflines or lighting zones, then it may take a couple of days or even weeks.
Here are some elements that affect the timeline:
Home size:
Larger homes naturally require more lighting and installation work.
Roofline complexity:
Multiple peaks, corners, and elevations can add installation time.
Lighting coverage:
A simple front-facing installation is different from lighting multiple sides of the home.
Access:
Difficult-to-reach areas may require additional setup.
Electrical requirements:
The crew needs to properly connect and test the system.
This means it doesn’t take much time, and you don’t have to plan a full week around the installation time.
Permanent Light Installation Process – Home Survey Comes First
You may not believe it, but that’s true. A lot of work happens before the actual installation day.
Here are a few things that need to get checked:
- Rooflines and eaves
- Home measurements
- Lighting locations
- Electrical access
- Controller placement
- Difficult installation areas
- Overall lighting coverage
This helps your crew prepare instead of figuring things out on the spot.
What to Expect Trimlight Install Day?
That’s where the fun begins.
Let us explain everything in steps so you can learn easily and quickly.
The Crew Arrives
The installation team comes and starts by
- Reviewing the installation plan
- Organizing equipment
- Preparing materials
- Checking work areas
- Confirming access around the property
Things will be carefully planned before the installation.
Installation Areas Are Prepared
After that, the crew gets your home ready for the lighting installation while focusing on the following:
- Roofline access
- Eaves and fascia
- Corners
- Architectural details
- Lighting placement
The main purpose? A clean installation that aligns with your home’s layout.
Permanent LED Lights Go Up
Here the actual lighting installation begins.
The crew:
- Installs the permanent LED lights
- Follows the planned roofline
- Works around corners and elevations
- Keeps the system visually clean
- Makes sure the lights blend with the home
Whether you are in Westlake, Terrytown, or another neighborhood of Austin, your home’s architecture plays a vital role in the installation process.
Connections are Completed
Once the crew installs all the lights, the system is connected.
Now this includes:
- Lighting connections
- Controller installation
- Necessary wiring
- Power connections
- System configuration
The team ensures that everything is working together before the project is considered finished.
Everything Gets Tested Properly
Before leaving, the crew tests the entire system.
They may test:
- Individual lights
- Lighting sections
- Colors
- Connections
- Controller
- App communication
- Overall operation
Make sure you find and fix the issue before the team leaves.
The Trimlight App Gets Set Up
Did you know your permanent lights can be controlled with an app on your phone?
You can simply use it to:
- Change colors
- Create lighting scenes
- Set schedules
- Adjust brightness
- Choose holiday themes
- Create special-event looks
- Sync lights with music
Instead of climbing ladders on every occasion to change lights, you can simply control and change them using an app.
Will Installation Disrupt Your Day?
No. Trimlight installation is less disruptive than any major home renovation project.
You probably notice:
- Crew members around your property
- Equipment in work areas
- Some installation noise
- Temporary access restrictions
But you generally don’t need to stand outside supervising everything.
You can often
- Work from home
- Run errands
- Handle your normal routine
- Spend time with your family
Make sure your crew has all the access they need to check things.
What Can Make Trimlight Installation Take Longer?
Every home is different, and so are its needs. So, installation may take longer because of the following:
- Large or multi-story homes
- Complicated rooflines
- Multiple lighting zones
- Difficult access
- Large outdoor living areas
- Additional electrical requirements
- Severe weather
How to Prepare for Installation Day?
Well, you don’t have to do much.
Just:
- Clear items from installation areas.
- Move outdoor decorations.
- Keep pets safely inside.
- Provide easy property access.
- Keep the driveway reasonably clear.
- Tell the crew about any special concerns.
That’s it. A little preparation may make your installation day less hectic.
What Happens After Trimlight Installation?
The best thing is you don’t have to start over for every holiday.
Your permanent LED lights stay in place, and you can change the colors and patterns using an app.
Now you can celebrate every holiday in style, including
- Christmas colors
- Halloween lighting
- Fourth of July colors
- Game-day colors
- Birthday or party lighting
- Everyday accent lighting
The lights stay, but the look changes.
Final Thoughts – Professional Lighting Installation Timeline
Trimlight installation in Austin is a planned, step-by-step process—not a week-long home renovation.
The process typically follows:
Survey → Prep → Install → Connect → Test → App Setup
The exact timeline depends on your home’s size, roofline, coverage, and installation requirements.
With Capital Austin Trimlight, you can get a better idea of your specific installation timeline before the work begins—and enjoy permanent outdoor lighting without making installation a major disruption to your week.